Build
Our build system entails a series of steps executed in a specific sequence, designed for maximum flexibility to accommodate your needs.
Build initiation happens through two possible triggers: a CLI deploy or a GitHub push once you've connected your repository to our platform.
Upon receiving your code (via CLI or GitHub), we initiate the build process. The build process utilizes one of the two tools: Docker or Buildpacks.
You have the option to initiate a new build manually from our web app, but it will still follow one of the two approaches mentioned earlier.
Tools
Docker
For Docker, we offer three configuration options:
Docker Preset: With presets for technologies like Node.js, Meteor, and more, we automatically set up a Dockerfile for you.Dockerfile Path: Alternatively, you can create your own Dockerfile. We'll use it to build your app, but you'll need to specify the Dockerfile Path relative to your code root path.Dockerfile Content: You can input your Dockerfile content directly into our web app. This is useful for custom Dockerfile requirements.
You can initiate with our Docker Preset, edit it in our web app, and then save it as a custom Dockerfile using the Dockerfile Content option.
We provide presets to simplify the Docker process for those unfamiliar with it. We also offer Buildpacks - a stand-alone build tool designed to configure your image without requiring a Dockerfile.
Buildpacks
Buildpacks offer build solutions without needing a Dockerfile, making it suitable for users who don't possess Docker knowledge or prefer not dealing with Docker configuration details.
The default builder for your app is set to paketobuildpacks/builder-jammy-full, but it can be replaced with any builder of your choice.
You can modify the Buildpacks builder or any other arguments using the Build Args field.
If your Buildpacks-generated image has multiple entrypoints, you can use the --default-process or -D argument to specify the desired entrypoint for a particular app. If you need to run multiple apps with the same image, you can configure two apps and the only difference will be the default process.
Image
Regardless of the tool you choose, we build an image to run your app on our platform.
The final result for both tools is identical – a Docker image ready to execute your app.
After your image is prepared, the next stage is Deploy.
We've implemented intelligent detection to reuse images. If an earlier build with the same code exists, we'll leverage that image to optimize time and resources.
Rebuild
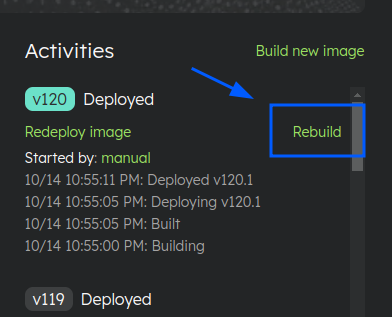
You can rebuild any existing builds by clicking the Rebuild button in the Activities sidebar.
This will trigger a new build with the same content as the original one.

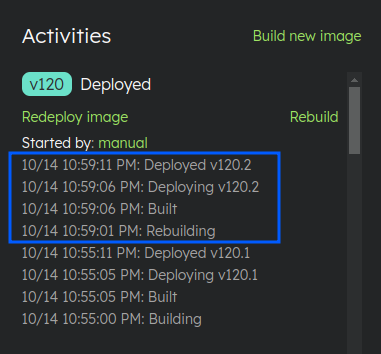
You can check the status of your new build in the Activities sidebar.
Once the build is complete, the deployment process will start automatically.

It's important to note that the Rebuild button is only available for versions whose source was uploaded via the CLI or GitHub.
If you deployed your app using a Docker image or if the version was created through the Image Reuse flow, you won't be able to rebuild it.
Note: You may see an indicator of "Build changes" after clicking the
Rebuildbutton. This happens because the build configuration of the chosen version is used for the new build, and not your current build configuration.